Sunday 31 May 2009

In & Out #3


IN:


- The weather! It's been lovely for the past 3 days and counting, I now have my fans at the ready because I detest being hot, so I can keep cool on days like these
- Stretching my ears up to a 0g, zebra print plugs on the way - woo!
- Trying to be more of a Yes Girl; so I can get out of this social rut I'm in
- Lily Lolo Blush Away, oh how I love you
- Finally having Sam's bands EP up, so I can listen to it over and over: www.myspace.com/november1888 - not everyone's cuppa tea which is fair enough, but I'm very proud of him all the same!
- Getting the garden sorted, so my neighbour's will stop poking their nose in pfft


OUT:
- Wearing dark colours on my nails, they need a breather due to all the staining. Bring on the lighter shades!
- Not getting a full refund on the shadows bought from a youtuber.. I dislike stubborn people especially when they're in the wrong
- Too much fizzy pop, my body needs waterwaterwater
- My minky doggy who will be getting bathed later - she won't stop rolling in the grass every time she goes out aha
- Cherry vaseline.. Yes Yes Yes! Oui Oui Oui! all the way baby

Friday 29 May 2009

Minzi's Package #1 and #2


Finally, I have gotten around to posting the lovely things that Minzi sent me. I've just been having so much fun trying everything out! I'll post the pictures and some swatches, so you can get a better idea of the products


She managed to get me some lovely bits from NYX, this is one of the trio's and it's number 28. Love all 3 colours, I will be able to create a lovely look using these!


This is Number 08 and this too has all the colours I need to make a great look - will be posting pics of this one soon.


She also got me 2 of the jumbo pencils - in Black Bean and Milk. I love them so much I've already bought more and have more on the way; they're just so creamy! And from the Loreal HIP range she got me a colour rich cream crayon - this green colour is so intense but you can't really see in the picture!


Also from Loreal HIP, she got me a Cream Shadow Pain in Secretive - this has been a great base when doing light neutral eyes! I've never seen anything like the pigment shadow stick before and this colour is SO me. I've been using this with my Barry M dazzle dust 88. The HIP liner? I don't see how I lived without this before! Just amazing.


From Wet N Wild, Minzi got me loads of cool things! The 2 liners are a great addition to my collection and both are colours I always wear. The H2O liner really is waterproof for the most part! The Confetti is so cute, you can never have too much glitter! She also got me a bronzer and the formulation of this is just so soft and easy to apply.


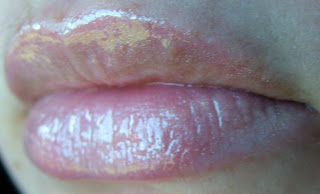
This is Wet N Wild's Glassy Gloss in 319A Beige Baby - a lovely beige colour with subtle shimmers

This is one of Wet N Wild's mega mixers and it's in Electric Lemonade - this stuff smells good enough to eat!

This is another of Wet N Wild's Glassy Gloss' in 310 Candy Glaze - a gorgeous barbie pink with neon glitters in!


The ULTA eyeshadow was a lovely surprise - because I'd been looking for a colour like this for a while. This has had so much use out of it already! Minzi said that the Luminous blush by Milani was a good dupe for NARS' Orgasm - so I'm very happy to have this instead. The colour is gorgeous and I've been wearing this one a lot too!


She also sent me 2 cute lip balm's.. these make me so happy! The tin's are adorablee, we don't have anything like this over here in the UK - booooo

As well as all of that, she managed to get me the Cover Girl lash blast mascara, NYX lipstick in Power and Sinful nail polish!
Just wow.. She really is a miracle worker with what she managed to do within our budget

Doing this swap with Minzi was just so much fun and she knows how much she's cheered me up by doing this with me!
I just want to say thanks again to you and I can't wait to do another one later on in the year with you!

x

Wednesday 27 May 2009

3 Looks For Summer!

3 Important Looks!

I decided to throw together 3 looks that I'll be wearing a lot this Summer (not the exact designer items.. I wish!) which are for a Night Out, a Night In and a Day at the Beach! These are probably the three looks we'll all be needing the most this Summer and I just wanted you to see my sort of style and things that I would pair together!

What will you be wearing this Summer?

Tuesday 26 May 2009

Lily Lolo; Review


Since I've had my samples from Lily Lolo, I've been dying to let you know what I think and show you some results. But I made sure I waited to give them a proper trial run so that I could review them fairly.
After about a month of using them, I think that time has come! 
So the first product of theirs to look into, is their cover up in Peep-O (49p for 1/4 teaspoon in ziploc bag). This is a matte yellow toned concealer, which is perfect for covering up those dark under eye circles. This is the before picture:


BEFORE
So as you can see, there is slight discolouration under my eyes, but not an awful lot - I still have sleepless nights due to children to come! Oh dear.. haha. Anyways, this is just to show how my skin looked before I applied anything.


AFTER
And this is after applying the concealer. You can see that the pinky undertones have been disguised, but I have to be honest and say that this is my least favourite product of theirs that I tried. I feel like it was just TOO powdery and overwhelming for such a delicate area. However I will try using this again, just with more moisturiser beforehand. This picture was taken before any other powders were put on top, so you can see the true outcome of this concealer. Once I applied my normal powder, you couldn't see the yellow anymore, which is good to hear!


Next up, is their other matte cover up concealer - Blush Away (49p for 1/4 teaspoon in ziploc bag). This is a green toned concealer and counteracts redness in the skin i.e blemishes, rosacea and sunburn:

BEFORE
One of the big problems I face with my skin, is that my cheeks are very red. It is as much embarassing as it is annoying! Other products that I've tried to counteract this problem have left me looking like I've either piled my make up on with a trowel, or my skin looks patchy and uneven with tell tale red patches showing through. This means I find it really hard to carry blush off properly, because the canvas underneath isn't all the same colour. This picture is also before anything else was applied - just fresh clean skin!


AFTER
I am so happy with this product, it's ridiculous! For once, my skin looks.. normal! I would be quite happy to wear this just on it's own with a powder, that's how impressed I am with the results. I will definitely be buying the full sized jar (£7) as I cannot be without this gem from now on! I am now confident enough to wear all my lovely blushes and feel that it looks even in colour and quite presentable - expect some FOTD featuring those! My new daily routine, is to apply my foundation as normal and then dust Blush Away over the areas that need it. After that, I apply my setting powder and I'm ready to go. No tell tale signs showing through and it has great lasting power for nights out too! No touch ups required; bonus.


Okay, so next I want to look at the 2 foundations and the 1 finishing powder I bought from Lily Lolo (all 99p for 0.75g in 5ml jar) :

As you can see from the pic, Candy Cane got ruled out immediately just for the fact it is no where near my skin tone! Porcelain was actually a near exact match - I hadn't even buffed this into the skin either! I think I may purchase the full sized jar and at £12 I think it really is worth it. The finishing powder was also lovely - it really did finish off my look and helped to ensure that I wasn't adding more coloured powder to my face when I needed to powder my nose. It kept me looking fresh and helped the staying power of my foundation.


Finally I want to look at 2 of their blushes that I tried (both 49p for 1/4 teaspoon in ziploc bag):

Doll Face is more of a peach on my fair skin and Rosebud is more of a true pink. Both blushes are easy to apply and blend; the colours are also easily buildable. I will definitely be ordering more of their blush samples to try, especially since they have various new summer shades recently launched! For 49p a sample, it's easy to find shades for your skin tone.


Overall, I'm really pleased with what Lily Lolo has to offer and with what they deliver. I only paid a £1 for postage and I received my items pretty quickly because they send it out first class via Royal Mail. Their products do not contain parabens, fragrances or fillers and they do not test on animals - which is always good to hear! They ship internationally, so that everyone has a chance to enjoy Lily Lolo and I definitely recommend their products to everyone, as you are sure to find something to suit you.

What products from Lily Lolo have you got and liked?

Monday 25 May 2009

NOTD #3


Today I wanted to use the polish that Minzi sent me as part of our make up swap (that WILL be posted this week, now that I have the second parcel) and she'd said it was a good dupe for China Glaze's Watermelon Rind - so seeing as I don't have that, I am a very happy woman indeed.
This is by Sinful Colors Professionals and the colour is San Francisco - 283.
I love how this polish applied, it went on so easily and required little effort to make it streak free. I am definitely wanting more from Sinful Colors if this one is anything to go by! This is it with 2 coats, just so that it was all opaque.


I'm loving the fine glitters in this polish and this colour makes a welcome change from all the spring colours we've been seeing! I may Konad this one though.. Hmm..

What do you think to this colour? Do you like Sinful Colors polish?

FOTD; Silver Lining


After such a lovely sunny day yesterday, it's back to the usual cloudy skies. Typical British summer; temperamental! 
Therefore I did today's look to coincide with the weather and opted for some smoky silvers. 
This is a quick and simple look to do, for days when the weather isn't on our side. Bring back the cloudless blue skies, please!


Eyes:
Urban Decay Vapor all over lid
Urban Decay Zero in the crease
Urban Decay Big Fatty Mascara
Benefit's High Beam for highlight

Face:
Dream matte mousse foundation in Sand
Lily Lolo Blush in Doll Face
MAC Perfect Topping

Lips:
GOSH Darling


What's your FOTD when the weather's not that great?

Sunday 24 May 2009

In & Out #2


IN:
- Finding out just how good a calzone is. Who knew?
- Payday was on friday and being able to relax for a while about money
- I won another competition this week?! I now have the Eyeko shopper!
- Knocking Sam out on UFC in 5 seconds, even though he's been playing it all weekend. I think his male ego is dented, ha!
- Having Ben & Jade round and having so much fun. Pics may be added at a later date of jager shots!
- Hearing Sam's band play finally and loving it. So proud of him
- Not worrying about my freckles showing, I'd rather be natural than cakey anyday!


OUT:
- My poor nails are stained, I need a good base so they can clear up!
- Having problems with my wisdom tooth, whilst not having a dentist. Bugger
- Getting my 2 eyeshadows from a youtuber and being completely smashed, booo. I hate paypal disputes :(
- Finding out my scan results
- My milk carton legs! I need a tan - real or fake - sharpish!

Thursday 21 May 2009

NYX Lippies; swatches


Okay, so today I decided to show you the NYX round lipsticks that I have, and what they look like on. On their website the swatches they provide aren't necessarily true to life. So a lot of the time it's trial and error. For us Brits, that can be a real pain because we can't even go to look at them in store to get a better idea.
So, I figured why not just post pictures of the swatches - then you can make a more informed decision when choosing the right colours for you. 
The have 143 different shades available in the round lipstick collection.. so that decision can be very hard!
For $3.50 you get 4g/0.14oz, which isn't bad at all! There are other websites though, that sell them for £1.25 a piece! www.mscuppycakes.com

I really like the packaging, it's not half as bad as some of the ones you get with cheaper brands. It's easy to keep clean and I love that underneath there is a clear section showing you the lipstick inside. Handy if you store your lipsticks upright!
The smell the lipstick has isn't so much of a problem for me, I've smelt worse haha. You really can't smell it once it's on your lips though - so it won't be off putting when wearing it, at all.
The texture of these is the thing I love most about them, they are just SO creamy. I've paid more for lipsticks that do the opposite and completely dry out my lips, which is never a good look! With these, I feel as though they're looking after my lips whilst they're on there. Sorted! 

I apologise in advance, we had crap weather today (as usual) and it was sunny one minute, cloudy the next and then raining! Sighh. Anyways, onto the the pictures!


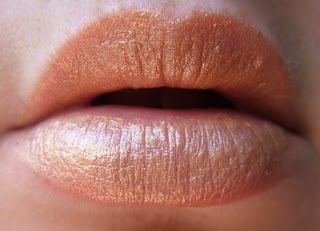
This is Celene 534; this is a lovely metallic light bronze colour and is one of the lighter shades I have
  

This is Creamy Beige 552; pretty much what the name suggests!


This is Cinnamon Sugar 567; this is a gorgeous brown, with a red undertone to it


This is Summerlove 617; such a great pink shade - this is a great day colour for me


This is Tea Rose 628; this is more of an intense berry pink


This is Power 629; this is one of my favourites - a fantastic lavender colour for the summer!


This is Pumkin Pie 630; a great light coral shade - another one for summer


So seeing as the weather wasn't helping, I took a picture of them all on my hand. Hope this is better!


What's your favourite NYX lipstick? I want more, so give me your recommendations   :)

Tuesday 19 May 2009

Faux Makeover


Oh my.. 
The other night I found a site and have been having so much fun on it, you wouldn't believe!
It's an online website that allows you to virtually make over yourself in a number of different ways, including: whitening your teeth, plumping your lips, thinning your eyebrows, getting coloured contacts and changing your hair in both colour and style - plus many more!

So onto the fun part! Pictures!

This is me as I am normally, just with blue eyes. This totally freaked me out though.. haha. I've never seen myself without green eyes! It's a cheap and easy way to see if I'd suit blue eyes and I think overall the contacts look pretty life-like? 


Ha. Okay. So this time I thought I wanted to change my hair.. Blonde bob? Liiiiiiittle bit of a change there! It would have worked SO much better if I'd have used a picture with all my hair off my face, but lesson learned. I also whitened my teeth, plumped my lips a little, added blush, eyeshadow, false lashes and liner. Plus I wanted to see what I'd look like with brown eyes.. Tada!


Hmm.. This is definitely more of an overdone look aha. I plumped my lips to the maximum they would go and this is what they would look like - I don't think I need any lip fillers! Haha. I also thinned my eyebrows out to the maximum and this just made them look drawn on to be honest. I kept my own hair, but opted for the blue eyes again. I also added false lashes, liner and shadow. Plus I tried out a different coloured foundation. Overall I just look over done and fake.. Boooo


Now, the other good thing about this site is that when you apply something to your face, it actually lets you know what brand and colour it is etc. This way you can virtually try before you buy! It's quite an innovative way to see what does and doesn't suit you. Whether it be that particular hair cut you've been umming and aahing over, if your foundation shade really is your true match, would you suit more shaped brows or even if you are just curious to see what you'd look like if ________ !

If this is something you fancy trying out just go to   www.taaz.com
Enjoy!

So, should I go through with any of the changes I did on myself?
What looks have you managed to come up with for you?   
:)

Monday 18 May 2009

Babyliss Conical Wand; Review


I bought the Babyliss Pro Curl 230 Tong a few weeks before my birthday as a little present to myself, so I've had it now for about 6 weeks. In that time I've gone from a complete novice and spending about 45 minutes trying to get my hair to look 'right', to being able to do my whole head and extensions in about 20. Not bad! 
In these 6 weeks I've definitely mastered the art of: section-hold-wrap-wait-release! I feel like I couldn't live without this now.. Oh dear.
It manages to give me different looks because of the way the curls turn out. I can create a volumised curly look, a relaxed beach waved look and also a full on ringlet look. Not bad for something that costs £25! 

Let's get the technical stuff out of the way first, so, it heats up to 200°C and has 4 different heat settings to choose from. Not only that but it is ready to use in 30 seconds. I've known some stylers to take aaaaaages and if i'm in a rush that is definitely one of my niggles. With this though, by the time I've sectioned my piece of hair and combed it through the conical is pretty much raring to go. Wahey!

I bought mine from Next online and it came with a 3 year guarantee, so I feel better knowing that i'm covered just in case anything goes wrong in that time. Which is always a good thing, when hair appliances can sometimes be so temperamental!

The general way to use a conical wand is to section your hair into different sizes (just to make it look more natural) and start from the bottom of your head then going upwards. Start with the furthest section away from you each time, this way you will be able to see what you're doing! If you do it the other way you'll find it harder to see past your wonderful curls!
So with each section of hair you want to wrap the hair (I usually do this away from myself) around the conical (leaving a couple of inches free at the scalp) and gently wrap the hair around the wand until all or most of the hair is around it. Be careful not to burn your fingers or ears though! It will hurt like a bugger! Once you've waited long enough (depending on your hair type and heat setting you've got it on) you just need to release the hair. And voila! Lovely curls!

Okay, so what I'll do now is i'll show you a picture of each of those 3 looks I can achieve and explain how I created them..

As you can see.. volumised! Wow. This isn't even me wearing extensions! I nearly couldn't fit all my hair in my laptop screen and that's saying something!
To achieve this, I repeated the general steps above but rather than leaving a chunk of hair free near my scalp I would curl all the way up - taking extra care not to burn my scalp! After each section was released I lightly sprayed it with hairspray. Once my whole head was done, near my crown I gently backcombed to give more height and volume. As you can see, it works!


Excuse the face.. haha, but this is the ringlet look I can create with the wand. This is what you can do with a bog standard curler, but it makes me happy that the wand can do it as well haha. I followed the general steps with this one also, but this time when wrapping my hair around the wand I kept all the hair tightly packed together as I went around. The tighter the wrapping = the tighter the curl. Very ringletty indeed!


And this is the relaxed beach wave look! This is probably my favourite and it's also the easiest - hoorah! As with the other two looks, I followed the general steps but this is really just the opposite of the ringlet look. This time you want to leave more space at the scalp AND at the ends of your hair. When the hair goes around, you want to leave wide spaces in between each wrap. Loose wrap around = loose curls. 


So here's a little close up of the curls created - very soft and natural looking in my opinion. And most importantly easy to do once you get the hang of it! So don't give up and keep trying   :)

What do you think? How have you gotten on with a conical wand?